Error:
npm WARN deprecated bcrypt@1.0.3: bcrypt < v2.0.0 is susceptible to bcrypt wrap-around bug. Upgrade to bcrypt >= v2.0.0 for improved support for newer bcrypt hashes
npm WARN deprecated i18next-client@1.10.3: you can use npm install i18next from version 2.0.0
npm WARN deprecated nodemailer@1.11.0: All versions below 4.0.1 of Nodemailer are deprecated. See https://nodemailer.com/status/
npm WARN deprecated mailparser@0.6.2: This project is unmaintained
npm WARN deprecated mimelib@0.3.1: This project is unmaintained
npm WARN deprecated mailcomposer@2.1.0: This project is unmaintained
npm WARN deprecated buildmail@2.0.0: This project is unmaintained
/usr/bin/node-red -> /usr/lib/node_modules/node-red/red.js
/usr/bin/node-red-pi -> /usr/lib/node_modules/node-red/bin/node-red-pi
+ node-red@0.18.7```

and though the update from 0.18.7 failed apparently, NR is still working. I stopped NR, t
If you have a version of Raspbian, or other Debian based install, such as Ubuntu , or Diet-Pi , that doesn’t have Node-RED already installed, you can install or upgrade using the Node-RED upgrade script command
bash <(curl -sL https://raw.githubusercontent.com/node-red/raspbian-deb-package/master/resources/update-nodejs-and-nodered)Pre generator hesiel je nutny update bcrypt:
npm install bcrypt --unsafe-perma nainstalovanie node-red-admin:
sudo npm install -g --unsafe-perm node-red-admin
Introduction
Node-RED is a switchboard for the Internet of Things, a visual tool that helps you connect your favorite apps, websites, and hardware together to do new and useful things. Most often compared to IFTTT or the late Yahoo Pipes, Node-RED has a much more powerful and flexible interface, and a large open source community creating nodes to interact with a wide variety of apps and services. In this tutorial, we'll install Node.js and Node-RED, get an SSL certificate from Let's Encrypt, and use Nginx to handle secure connections for Node-RED.
Prerequisites
To follow this tutorial, you will need:
- One Ubuntu 16.04 server with a non-root sudo user and basic firewall set up by following this Ubuntu 16.04 sever setup tutorial. For this tutorial, we'll use a user called sammy, but of course you can choose whatever you like and substitute as needed.
- The web server Nginx installed, with the firewall updated to allow traffic on ports 80 and 443 (Nginx Full), as explained in How To Install Nginx on Ubuntu 16.04
- A domain name pointed at your server, as described in How To Set Up a Host Name with DigitalOcean. This tutorial will use
node-red.example.comthroughout. - Let's Encrypt installed, and a certificate generated for the domain you configured above. How To Secure Nginx with Let's Encrypt on Ubuntu 16.04 will walk you through the necessary steps. You can ignore the steps regarding Nginx configuration (steps 3–5), as we'll cover that here. Just make sure you get a certificate successfully issued, and set up the
cronjob to handle automatic renewals.
Step 1 — Installing Node.js and npm
Ubuntu 16.04 makes it easy to install the latest long term support (LTS) release of Node.js because it's included in the default repository.
- sudo apt-get install nodejs-legacy
The command installs Node.js v4.2.x LTS (long term support), which means the Node.js Foundation will continue to support this version for 30 months from its release date of October 12, 2015. Note: It's important to install the -legacy version of the package because Node-RED's startup scripts expect your Node.js binary to be named node, but the standard package uses nodejs instead. This is due to a naming conflict with a preexisting package. Verify that the installation was successful by checking the version.
- node -v
You'll see Node.js output its version number:
v4.2.6
Node Package Manager (npm) helps you install and manage Node.js software packages, and we'll use it to install Node-RED. Install npm using apt-get.
- sudo apt-get install npm
To verify the install was successful, ask npm to print its version information:
- npm -v
3.5.2
If it prints a version number without error, we can continue on to our next step, where we'll use npm to install Node-RED itself.
Step 2 — Installing Node-RED
Use npm to install node-red and a helper utility called node-red-admin.
- sudo npm install -g --unsafe-perm node-red node-red-admin
npm normally installs its packages into your current directory. Here, we use the -g flag to install packages 'globally' so they're placed in standard system locations such as /usr/local/bin. The --unsafe-permflag helps us avoid some errors that can pop up when npm tries to compile native modules (modules written in a compiled language such as C or C++ vs. JavaScript). After a bit of downloading and file shuffling, you'll be returned to the normal command line prompt. Let's test our install. First, we'll need to open up a port on our firewall. Node-RED defaults to using port 1880, so let's allow that.
- sudo ufw allow 1880
And now launch Node-RED itself. No sudo is necessary, as port 1880 is high enough to not require root privileges.
- node-red
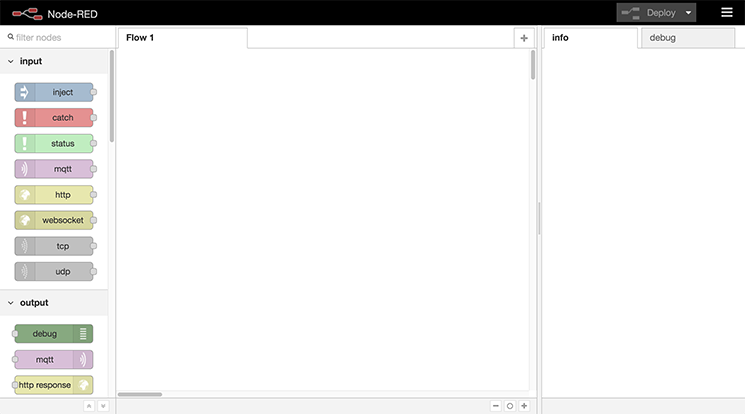
Some "Welcome to Node-RED" messages will print to the terminal. On your computer, point a web browser to port 1880 of the server. In our example, that's http://node-red.example.com:1880. The main admin interface of Node-RED will load.
If it worked, you can type CTRL+C in your terminal to shut down Node-RED and return to the command prompt. We've installed Node-RED successfully and tested it out, so next, we'll set it up to launch during system startup.
Step 3 — Launching Node-RED on Startup
In order to start Node-RED automatically on startup, we'll need to install a node-red.service file instead of the more traditional init script. This is because Ubuntu 16.04 is the first LTS release that uses systemdfor its init system. You can find a summary of this and other Ubuntu 16.04 changes in What's New in Ubuntu 16.04. Open a blank service file called node-red.service.
- sudo nano /etc/systemd/system/node-red.service
Copy and paste in the following, then save and close the file.
[Unit]
Description=Node-RED
After=syslog.target network.target

[Service]
ExecStart=/usr/local/bin/node-red-pi --max-old-space-size=128 -v
Restart=on-failure
KillSignal=SIGINT

# log output to syslog as 'node-red'
SyslogIdentifier=node-red
StandardOutput=syslog

# non-root user to run as
WorkingDirectory=/home/sammy/
User=sammy
Group=sammy

[Install]
WantedBy=multi-user.target
A full explanation of systemd service files is beyond this tutorial, but you can learn more by reading Systemd Essentials: Working with Services, Units, and the Journal. That said, let's break down some of the sections in our service file:
[Unit]
Description=Node-RED
After=syslog.target network.target
This describes our service and indicates that it should be started after networking and syslog are functioning.
[Service]
ExecStart=/usr/local/bin/node-red-pi --max-old-space-size=128 -v
Restart=on-failure
KillSignal=SIGINT
ExecStart is the command needed to start our service. We call node-red-pi instead of plain node-red so we can pass some memory-saving options to Node.js. This should allow it to run well on any reasonably sized server, depending of course on how many flows you create in Node-RED (and how complicated they are). Restart=on-failure means systemd will try to restart Node-RED if it crashes, and KillSignal tells systemd the best way to quit Node-RED when it needs to shut down or restart the process.
# log output to syslog as 'node-red'
SyslogIdentifier=node-red
StandardOutput=syslog
This sets the label used when logging, and logs all output to the syslog service.
# non-root user to run as
WorkingDirectory=/home/sammy/
User=sammy
Group=sammy
We want to run Node-RED as our non-root user. The lines above tell systemd to launch Node-RED using our user and group, and from within our home directory.
[Install]
WantedBy=multi-user.target
WantedBy indicates the targets our service should run under. In this case, when Ubuntu boots into multi-user mode, it will know to also launch our Node-RED service. Muti-user mode is the default startup target. Now that our service file is installed and understood, we need to enable it. This will enable it to execute on startup.
- sudo systemctl enable node-red
Let's manually start the service now to test that it's still working.
- sudo systemctl start node-red
Point a browser back at the server's port 1880 and verify that Node-RED is back up. If it is, shut it back down until we secure the install in the next step.
- sudo systemctl stop node-red
Step 4 — Setting Up Nginx
We're going to use Nginx to proxy the Node-RED service. This means Nginx will handle all of the SSL connections on port 443 (using the Let's Encrypt certificates you previously set up), and then pass the traffic along to Node-RED. Oopen a new Nginx configuration for the site.
- sudo nano /etc/nginx/sites-enabled/node-red.example.com
Copy and paste the following, changing the server name and certificate paths:
server {
    listen 80;
    listen 443 ssl http2;
    server_name node-red.example.com;
    ssl_certificate /etc/letsencrypt/live/node-red.example.com/fullchain.pem;
    ssl_certificate_key /etc/letsencrypt/live/node-red.example.com/privkey.pem;
    ssl_protocols TLSv1 TLSv1.1 TLSv1.2;
    ssl_ciphers EECDH+AES128:RSA+AES128:EECDH+AES256:RSA+AES256:EECDH+3DES:RSA+3DES:!MD5;
    ssl_prefer_server_ciphers On;
    ssl_session_cache shared:SSL:128m;
    ssl_stapling on;
    ssl_stapling_verify on;
    resolver 8.8.8.8;

    location / {
        if ($scheme = http) {
            return 301 https://$server_name$request_uri;
        }
        proxy_pass http://localhost:1880;
        proxy_set_header Host $host;
        proxy_set_header X-Real-IP $remote_addr;
        proxy_http_version 1.1;
        proxy_set_header Upgrade $http_upgrade;
        proxy_set_header Connection "upgrade";
    }

    location '/.well-known/acme-challenge' {
        root /var/www/html;
    }
}
Save and close the file. Let's explain what this file does. The first three lines tell Nginx what ports to listen on, and what domain name to respond to. The ssl_certificate and ssl_certificate_key lines point to the certificates we retrieved from Let's Encrypt. The remaining ssl_ lines choose protocols, ciphers, and options that are more secure than the defaults. location / starts the block where we actually define our Node-RED proxy.
if ($scheme = http) {
    return 301 https://$server_name$request_uri;
}
This block will match any plain, non-secure http connections, and redirect them to the https version of the site.
proxy_pass http://localhost:1880;
We point to our Node-RED service here. It is available on localhost, at port 1880, so we pass connections to it there. The remainder of this block of configuration sets some headers that are important for proper proxy functioning. The Upgrade and Connection headers are especially important for handling Node-RED's websocket connections. Finally, we have a block to make sure the Let's Encrypt challenge responses continue to be fetched from Nginx's default web root:
location '/.well-known/acme-challenge' {
    root /var/www/html;
}
Reload Nginx to pick up the new configuration.
- sudo systemctl reload nginx
Finally, start Node-RED again.
- sudo systemctl start node-red
Once again, navigate to your server: http://node-red.example.com. You should be redirected to https://node-red.example.com (note the https) and see the Node-RED admin interface. This means we're now proxying Node-RED through Nginx. We just have a few more tweaks to lock down Node-RED, and then we'll be finished.
Step 5 — Securing Node-RED and Wrapping Up
Now that our connection is secure, let's add a password to the Node-RED admin. Instead of putting a bare password right into our settings file, we first make a one-way cryptographic hash of it, and use that instead. We'll use node-red-admin to create the hash:
- node-red-admin hash-pw
You will be prompted for a password. Type it in, press ENTER, and a hash will be printed on screen. Copy that to your clipboard and open the Node-RED settings file.
- nano ~/.node-red/settings.js
Scroll down and uncomment the adminAuth block (by removing the "// " in front of each line). Change username to whatever you like, and paste the hash into the password field.
adminAuth: {
    type: "credentials",
    users: [{
        username: "admin",
        password: "$2a$08$Ab9prIr1M8a5a1/Zx8.B9.uIOCPe.v90ZGuZc2kAATp6BHJ/WV5KS",
        permissions: "*"
    }]
},
While we've got the file open, uncomment the uihost line as well by removing the // at the front of the line.
uiHost: "localhost",
This means Node-RED will only listen on the local interface, and wont be reachable directly by the outside world (it will only be accessed through the Nginx proxy). You can now save and close the file. Update the firewall one last time, just to make sure Node-RED is never directly accessible.
- sudo ufw deny 1880
Finally, restart Node-RED.
- sudo systemctl restart node-red
Navigate to https://node-red.example.com and you'll see a login screen instead of the main editing interface.
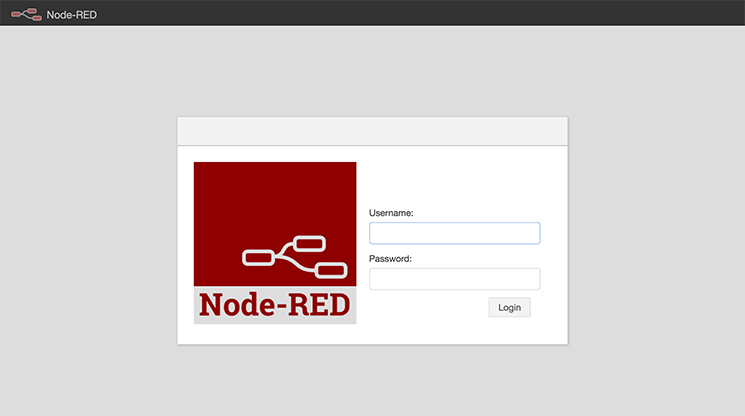
If your site is showing a login screen and an https connection, you've set everything up correctly.
Conclusion
We now have a reasonably secure installation of Node-RED, being proxied by Nginx using Let's Encrypt for its SSL certificates. Log in and get wiring! There is much more information and project inspiration available at Node-RED's website.